NVMe over RDMA的环境上安装ZFS


本文主要介绍将NVMe盘通过RDMA映射到远端机器后,再在该机器上安装ZFS。
如何安装NVMe over RDMA,请参考上一篇文章:NVMe over RDMA的安装配置

说明:本文所有命令执行的系统为debian。

安装ZFS

直接使用”apt install -y zfsutils-linux”安装ZFS,会出现问题,详细解决办法请参考本文后面的遇到的错误及解决办法

可直接按如下步骤进行安装:

1
2
3
1. apt-get install dpkg-dev linux-headers-$(uname -r) linux-image-amd64
2. apt-get install zfs-dkms zfsutils-linux
3. modprobe zfs

创建存储池

创建ZFS存储池(普通存储池,相当于RAID0,无冗余)

1.机器上要有相应的硬盘,本文以NVMe盘为例,nvme0n1和nvme1n1。
2.查看存储池状态:

1
2
zpool status   
no pools available

3.创建ZFS存储池,以nvme0n1和nvme1n1为例:
创建好后,用zpool status查看是如下结果,如遇到错误请参考后面的解决办法。

1
2
3
4
5
6
7
8
9
10
11
12
13
# zpool create mypool nvme0n1 nvme1n1
# zpool status
pool: mypool
state: ONLINE
scan: none requested
config:

NAME STATE READ WRITE CKSUM
mypool ONLINE 0 0 0
nvme0n1 ONLINE 0 0 0
nvme1n1 ONLINE 0 0 0

errors: No known data errors

使用ZFS创建这种简单的池意义不大,这相当于没有冗余(类似RAID0)

创建下一个存储池前,记得清理存储池

1
zpool destroy mypool

一个简单的镜像池

还是使用nvme0n1和nvme1n1两个盘,创建一个简单的镜像池:

1
2
3
4
5
6
7
8
9
10
11
12
13
14
# zpool create mypool mirror nvme0n1 nvme1n1
# zpool status
pool: mypool
state: ONLINE
scan: none requested
config:

NAME STATE READ WRITE CKSUM
mypool ONLINE 0 0 0
mirror-0 ONLINE 0 0 0
nvme0n1 ONLINE 0 0 0
nvme1n1 ONLINE 0 0 0

errors: No known data errors

创建RAIDZ2的存储池

RAIDZ-2至少需要4块硬盘,RAIDZ-2能容忍最多两盘故障。
例子中使用4块NVMe盘:nvme0n1 nvme1n1 nvme2n1 nvme3n1。

1
2
3
4
5
6
7
8
9
10
11
12
13
14
15
16
zpool create zfstest raidz2 nvme0n1 nvme1n1 nvme2n1 nvme3n1
root@cld-mon1-12002:~# zpool status
pool: zfstest
state: ONLINE
scan: none requested
config:

NAME STATE READ WRITE CKSUM
zfstest ONLINE 0 0 0
raidz2-0 ONLINE 0 0 0
nvme0n1 ONLINE 0 0 0
nvme1n1 ONLINE 0 0 0
nvme2n1 ONLINE 0 0 0
nvme3n1 ONLINE 0 0 0

errors: No known data errors

对存储池创建数据集(创建文件系统)

使用命令查看上面创建的zfstest池:

1
2
3
# zfs list
NAME USED AVAIL REFER MOUNTPOINT
zfstest 114K 2.80T 32.9K /zfstest

创建数据集test:

1
2
3
4
5
# zfs create zfstest/test
# zfs list
NAME USED AVAIL REFER MOUNTPOINT
zfstest 151K 2.80T 32.9K /zfstest
zfstest/test 32.9K 2.80T 32.9K /zfstest/test

销毁zfs数据集

销毁zfs数据集使用”zfs destroy”命令,下面的例子中把数据集tabriz销毁了:

1
# zfs destroy tank/home/tabriz

注意:如果遇到要销毁的数据集正忙,无法umount,可以使用-f参数强制销毁。

1
2
3
4
# zfs destroy tank/home/ahrens
cannot unmount 'tank/home/ahrens': Device busy

# zfs destroy -f tank/home/ahrens

另外,我犯了一个错误,就是在zfstest/test/目录下执行“zfs destory zfstest/test”,然后一直报
“umount: /zfstest/test: target is busy.
cannot unmount ‘/zfstest/test’: umount failed”,加-f参数也不行,其实不在那个目录就好了。

FIO测试其性能

大文件单线程写

1
2
3
4
5
6
7
8
9
10
11
12
13
14
15
16
17
18
19
20
21
22
23
24
25
26
27
28
29
30
31
32
root@XXX:/zfstest/test# fio --group_reporting --time_based   --norandommap --name=big-file-single-write --directory=/zfstest/test --rw=write --bs=4M --size=10G --time_based --runtime=300  --numjobs=1 --output big-file-single-write.txt
root@XXX:/zfstest/test# 7MiB/s][w=736 IOPS][eta 00m:00s]
root@XXX:/zfstest/test#
root@XXX:/zfstest/test# cat big-file-single-write.txt
big-file-single-write: (g=0): rw=write, bs=(R) 4096KiB-4096KiB, (W) 4096KiB-4096KiB, (T) 4096KiB-4096KiB, ioengine=psync, iodepth=1
fio-3.12
Starting 1 process
big-file-single-write: Laying out IO file (1 file / 10240MiB)

big-file-single-write: (groupid=0, jobs=1): err= 0: pid=1769227: Thu Oct 14 20:25:16 2021
write: IOPS=692, BW=2771MiB/s (2906MB/s)(812GiB/300002msec); 0 zone resets
clat (usec): min=924, max=108499, avg=1342.66, stdev=639.84
lat (usec): min=973, max=108576, avg=1441.28, stdev=648.02
clat percentiles (usec):
| 1.00th=[ 1012], 5.00th=[ 1074], 10.00th=[ 1123], 20.00th=[ 1188],
| 30.00th=[ 1221], 40.00th=[ 1270], 50.00th=[ 1303], 60.00th=[ 1336],
| 70.00th=[ 1385], 80.00th=[ 1450], 90.00th=[ 1565], 95.00th=[ 1696],
| 99.00th=[ 2278], 99.50th=[ 2606], 99.90th=[ 3392], 99.95th=[ 3654],
| 99.99th=[ 4490]
bw ( MiB/s): min= 1944, max= 3080, per=99.99%, avg=2770.98, stdev=141.42, samples=600
iops : min= 486, max= 770, avg=692.71, stdev=35.36, samples=600
lat (usec) : 1000=0.51%
lat (msec) : 2=97.68%, 4=1.78%, 10=0.02%, 250=0.01%
cpu : usr=7.11%, sys=90.80%, ctx=61584, majf=0, minf=74187
IO depths : 1=100.0%, 2=0.0%, 4=0.0%, 8=0.0%, 16=0.0%, 32=0.0%, >=64=0.0%
submit : 0=0.0%, 4=100.0%, 8=0.0%, 16=0.0%, 32=0.0%, 64=0.0%, >=64=0.0%
complete : 0=0.0%, 4=100.0%, 8=0.0%, 16=0.0%, 32=0.0%, 64=0.0%, >=64=0.0%
issued rwts: total=0,207849,0,0 short=0,0,0,0 dropped=0,0,0,0
latency : target=0, window=0, percentile=100.00%, depth=1

Run status group 0 (all jobs):
WRITE: bw=2771MiB/s (2906MB/s), 2771MiB/s-2771MiB/s (2906MB/s-2906MB/s), io=812GiB (872GB), run=300002-300002msec
1
2
3
4
5
6
7
8
9
10
11
12
13
14
15
16
17
18
19
20
21
22
23
24
25
26
27
28
29
30
31
root@XXX# fio --group_reporting --time_based  --iodepth=32 --norandommap --name=big-file-single-write --directory=/zfstest/test --rw=write --bs=4M --size=10G --time_based --runtime=300  --numjobs=1 --output big-file-single-write.txt
root@XXX:# iB/s][w=672 IOPS][eta 00m:00s]
root@XXX:#
root@XX:/# cat big-file-single-write.txt
big-file-single-write: (g=0): rw=write, bs=(R) 4096KiB-4096KiB, (W) 4096KiB-4096KiB, (T) 4096KiB-4096KiB, ioengine=psync, iodepth=32
fio-3.12
Starting 1 process

big-file-single-write: (groupid=0, jobs=1): err= 0: pid=3774285: Thu Oct 14 20:43:03 2021
write: IOPS=685, BW=2742MiB/s (2875MB/s)(803GiB/300001msec); 0 zone resets
clat (usec): min=924, max=103373, avg=1357.26, stdev=552.14
lat (usec): min=979, max=103459, avg=1457.04, stdev=561.19
clat percentiles (usec):
| 1.00th=[ 1029], 5.00th=[ 1090], 10.00th=[ 1139], 20.00th=[ 1205],
| 30.00th=[ 1237], 40.00th=[ 1287], 50.00th=[ 1319], 60.00th=[ 1352],
| 70.00th=[ 1401], 80.00th=[ 1467], 90.00th=[ 1565], 95.00th=[ 1713],
| 99.00th=[ 2278], 99.50th=[ 2671], 99.90th=[ 3490], 99.95th=[ 3851],
| 99.99th=[ 4883]
bw ( MiB/s): min= 2104, max= 3027, per=100.00%, avg=2741.44, stdev=122.83, samples=599
iops : min= 526, max= 756, avg=685.33, stdev=30.71, samples=599
lat (usec) : 1000=0.34%
lat (msec) : 2=97.88%, 4=1.75%, 10=0.03%, 250=0.01%
cpu : usr=6.98%, sys=91.12%, ctx=58822, majf=0, minf=66995
IO depths : 1=100.0%, 2=0.0%, 4=0.0%, 8=0.0%, 16=0.0%, 32=0.0%, >=64=0.0%
submit : 0=0.0%, 4=100.0%, 8=0.0%, 16=0.0%, 32=0.0%, 64=0.0%, >=64=0.0%
complete : 0=0.0%, 4=100.0%, 8=0.0%, 16=0.0%, 32=0.0%, 64=0.0%, >=64=0.0%
issued rwts: total=0,205618,0,0 short=0,0,0,0 dropped=0,0,0,0
latency : target=0, window=0, percentile=100.00%, depth=32

Run status group 0 (all jobs):
WRITE: bw=2742MiB/s (2875MB/s), 2742MiB/s-2742MiB/s (2875MB/s-2875MB/s), io=803GiB (862GB), run=300001-300001msec

大文件并发写

1
2
3
4
5
6
7
8
9
10
11
12
13
14
15
16
17
18
19
20
21
22
23
24
25
26
27
28
29
30
31
32
33
34
35
36
37
38
39
40
41
42
43
44
45
46
47
root@XXX:/zfstest/test# fio --group_reporting --time_based --iodepth=32  --norandommap --name=big-file-multi-write --directory=/zfstest/test/ --rw=write --bs=4M --size=10G --time_based --runtime=300  --numjobs=16 --output big-file-multi-write.txt
root@XXX:/zfstest/test# 3367MiB/s][w=841 IOPS][eta 00m:00s]
root@XXX:/zfstest/test# cat big-file-multi-write.txt
big-file-multi-write: (g=0): rw=write, bs=(R) 4096KiB-4096KiB, (W) 4096KiB-4096KiB, (T) 4096KiB-4096KiB, ioengine=psync, iodepth=32
...
fio-3.12
Starting 16 processes
big-file-multi-write: Laying out IO file (1 file / 10240MiB)

big-file-multi-write: (groupid=0, jobs=16): err= 0: pid=1473793: Thu Oct 14 20:59:04 2021
write: IOPS=834, BW=3339MiB/s (3501MB/s)(978GiB/300016msec); 0 zone resets
clat (usec): min=1428, max=162761, avg=18864.46, stdev=6169.03
lat (usec): min=1668, max=163066, avg=19166.41, stdev=6189.02
clat percentiles (usec):
| 1.00th=[14484], 5.00th=[15139], 10.00th=[15533], 20.00th=[15926],
| 30.00th=[16450], 40.00th=[17171], 50.00th=[17433], 60.00th=[17957],
| 70.00th=[18220], 80.00th=[19006], 90.00th=[22414], 95.00th=[30278],
| 99.00th=[49021], 99.50th=[58459], 99.90th=[69731], 99.95th=[73925],
| 99.99th=[83362]
bw ( KiB/s): min=147456, max=589824, per=6.25%, avg=213576.59, stdev=22303.40, samples=9595
iops : min= 36, max= 144, avg=52.10, stdev= 5.45, samples=9595
lat (msec) : 2=0.03%, 4=0.08%, 10=0.20%, 20=85.23%, 50=13.51%
lat (msec) : 100=0.94%, 250=0.01%
cpu : usr=1.62%, sys=10.60%, ctx=8083125, majf=0, minf=172228
IO depths : 1=100.0%, 2=0.0%, 4=0.0%, 8=0.0%, 16=0.0%, 32=0.0%, >=64=0.0%
submit : 0=0.0%, 4=100.0%, 8=0.0%, 16=0.0%, 32=0.0%, 64=0.0%, >=64=0.0%
complete : 0=0.0%, 4=100.0%, 8=0.0%, 16=0.0%, 32=0.0%, 64=0.0%, >=64=0.0%
issued rwts: total=0,250401,0,0 short=0,0,0,0 dropped=0,0,0,0
latency : target=0, window=0, percentile=100.00%, depth=32

Run status group 0 (all jobs):
WRITE: bw=3339MiB/s (3501MB/s), 3339MiB/s-3339MiB/s (3501MB/s-3501MB/s), io=978GiB (1050GB), run=300016-300016msec

遇到的错误及解决办法

使用zpool status命令,报“ZFS modules are not loaded”错误

1
2
3
zpool status
The ZFS modules are not loaded.
Try running '/sbin/modprobe zfs' as root to load them.

解决办法:使用命令”modprobe zfs”加载zfs模块,不过很可能会遇到下一个的问题,把下面的那个问题解决了,该问题也就解决了,详情看下个问题的解决办法

使用“modprobe zfs”报“Module zfs not found in directory”错误

1
2
~# modprobe zfs
modprobe: FATAL: Module zfs not found in directory /lib/modules/4.19.0-10-amd64

解决办法:需要先安装内核相关的头文件,然后在重新安装zfs相关组件,具体步骤如下:

1
2
3
1. apt-get install dpkg-dev linux-headers-$(uname -r) linux-image-amd64
2. apt-get install zfs-dkms zfsutils-linux
3. modprobe zfs

这样,该问题解决,上一个问题也就解决了。

1
2
zpool status
no pools available

创建存储池遇到”xx is in use and contains a LVM2_member filesystem”错误

1
2
3
# zpool create mypool nvme0n1 nvme1n1
/dev/nvme0n1 is in use and contains a LVM2_member filesystem.
/dev/nvme1n1 is in use and contains a LVM2_member filesystem.

解决办法:这是因为我原先使用该环境搭建了Ceph并且已经使用了那两个盘,清理掉相应的环境,并删除对应的LVM即可。删除LVM可以参考该文章关于LVM的概念及相关操作
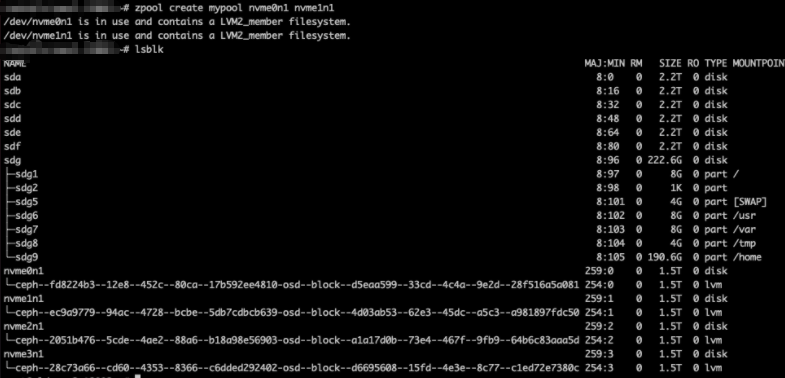
删除卷组vg:

1
for i in `pvs | grep ceph | awk '{ print $2 }'`; do vgremove -y $i; done

删除物理卷:

1
for i in `pvs | grep dev | awk '{ print $1 }'`; do pvremove -y $i; done

cannot unmount ‘tank/home/ahrens’: Device busy

解决办法

  1. 加 -f 参数
  2. 如果还不行看看是不是自己正在那个要umount的目录下,换到其他目录再执行umount即可。

参考资料

关于LVM的概念及相关操作

在Linux上安装和使用ZFS

如果你觉得本文对你有帮助,欢迎打赏